These solar wiring diagrams are a complete A-Z solution for a DIY camper electrical build. I read that you Highly recommend a dual pole solar cutoff switch, but don''t see any in any of the diagrams? And I wonder if I am
receive monitoring data. See the Equinox Installation Guide (#518101) for the. • Hardware that supports 6.8 kg (15 lbs) to install the bracket • RJ45 crimp tool • Wire cutter and stripper • Step
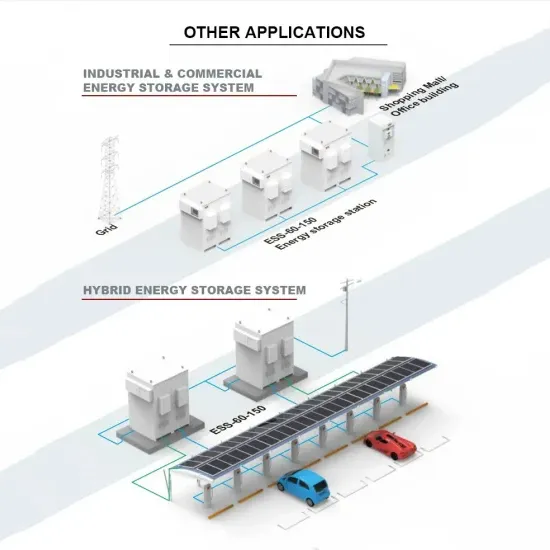
On the other hand, if you''re connecting 42 x EcoFlow 400W rigid solar panels to 3 x DELTA Pro Ultra Inverters + Home Backup batteries, the diagram will be considerably more complicated.. For solar panel arrays with
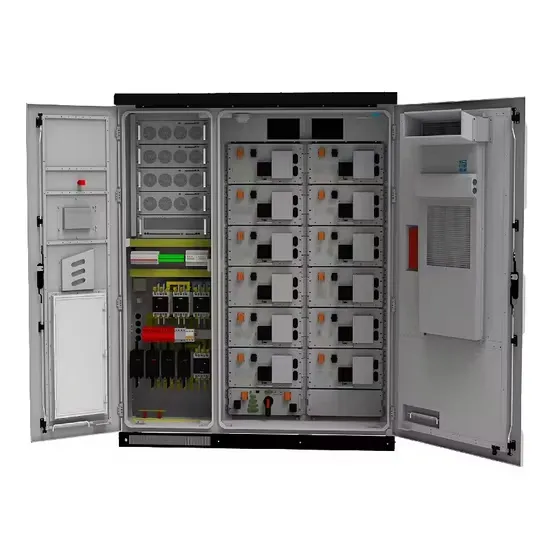
This manual contains important instructions for use during installation and maintenance of the Solar Power System. To reduce the risk of electrical shock, and to ensure the safe installation
The grid tie solar system wiring diagram typically includes key components such as solar panels, an inverter, a meter, and a power grid connection. A grid tie solar system requires a special
Emporia Vue 2 Home Energy Monitor Installation Guide; Emporia Vue 2 Home Energy Monitor Installation Guide (ES) Emporia Vue Utility Connect Installation Guide; Technical Specs. Emporia Vue 3 Home Energy Monitor Tech Spec;

Pole mounting solar panel bracket and insulated battery box with a lockable lid and a pole mounting bracket. Suitable for a 102Ah battery and a panel of up to 100W. Fits onto a 50mm pole. Technical Specifications Solar Panel Bracket
mo 15.0-3 480 / 20.0-3 480 / 22.7-3 480 / 24.0-3 480 with the "Ecofuse" op-tion:The use of string. fuses in the Fronius Symo provides additional fuse protection for solar modules.The maximum
1. Install the bracket with the semi-circles facing down, as shown below. Verify that the bracket is firmly attached to the mounting surface. If you are connecting the meter to a revenue grade inverter, refer to Installing Two Meters on page 19.
Standard tools can be used during the installation of the SolarEdge system. The following is a recommendation of the equipment needed for installation: Cordless drill (with a torque clutch) or screwdriver and bits suitable for the surface on which the inverter and optimizers will be installed and for opening the Safety Switch drill guides.
Mount the meter on a wall or pole using the supplied bracket. 1. Install the bracket with the semi-circles facing down, as shown below. Verify that the bracket is firmly attached to the mounting surface.
Switch off AC to the inverter on the main service panel. Make sure the PV voltage is lower than 30V. Toggle off the battery ON/OFF/P switch. Turn off the battery circuit breaker. Select an appropriate installation location. Position the mounting bracket against the installation surface. Mark two or more drilling spots.
Twist the wires together and insert them into the terminal. Securely tighten the terminal screws. 2. Terminate the SolarEdge device as described in Installing and Connecting the Meter on page 7. The built-in RGM is pre-configured as a production meter and its settings should not be changed.
1. Verify that power is OFF before making connections. 2. Insert a grounding cable through the appropriate conduit and the knockout that was opened and connect it from Pin 10 of the 10-pin terminal block to the grounding terminal (bus-bar) at the bottom of the meter enclosure. 3.