This DIY solar panel stand is very lightweight. It weighs right about 15lbs without the solar panels attached. The flexible solar panels I use weigh 4lbs each. The panels and the mounting rack together weigh a total of
Key Takeaway 5: Mounting the solar panel requires choosing a south-facing location with maximum sun exposure, tilting it at an angle equal to the latitude, using a mounting bracket for attachment, ensuring sufficient air flow for
This will help you monitor the performance of your solar panel system and make any necessary adjustments to maximise its efficiency. Types of Tiles Suitable for Solar Panel Integration. Choosing the right type of tiles is crucial. The
· Ensures uniform solar exposure, improving power generation efficiency of by maintaining a flat solar panel surface · 30-60° adjustable angle bracket, adapting to diverse light conditions ·
The first step is to attach the fixing bracket to the solar panel. Lay the solar panel face-down on the tarp or canvas to protect the photovoltaic surface. You want to be sure the mounting holes on the back of the panel
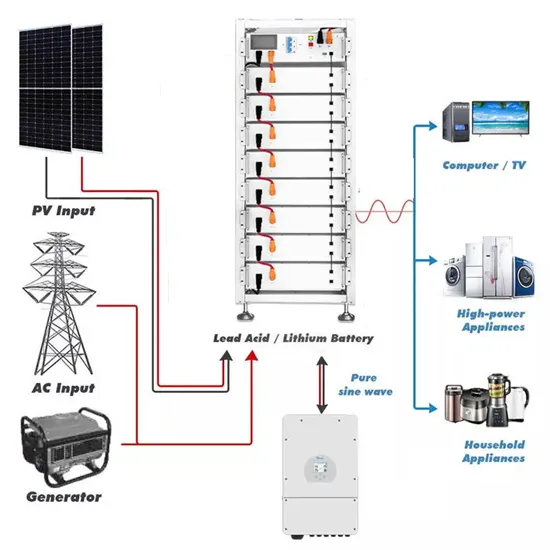
Several manufacturers make stationary solar panel mounting structures designed to work with almost any solar panel model. This hardware is intended for multiple applications and different mounting techniques, and considerations like wind
Determine if you want the panel to be mounted vertically or horizontally. I was told it does not matter. I chose a horizontal mount. Install the Z-brackets to the panel ; Measure the distance from the top of one Z-bracket to the bottom of the other
To install a solar panel bracket, apply adhesive to the upper side of the bracket (this is where the solar panel will be positioned). Position and press firmly the side bracket along the side of the solar panel and repeat this process with the other side bracket. Allow the adhesive to dry as per the product specifications.
Solar panel brackets function by being installed through fastening bolts or applying adhesive on the mounting rails onto a flat surface. Solar panels should be installed at an angle to allow the cells to receive as much sunlight as possible.
The first step is to attach the fixing bracket to the solar panel. Lay the solar panel face-down on the tarp or canvas to protect the photovoltaic surface. You want to be sure the mounting holes on the back of the panel align with the holes in the fixing bracket. Don’t modify the module frame because doing so may void your manufacturer’s warranty.
Depending on various factors, your solar panel mounting process might differ slightly. For this guide, we use the EcoFlow Tilt Mount Bracket for EcoFlow 400W Rigid Solar Panel as an example. Make sure to consult your equipment manuals before proceeding to install your panels.
Mark where you want to attach your triangle brackets to the wall. Use a tape measure to make sure they’re installed as far apart as your solar panel is wide. Screw the brackets to the wall, using a level to make sure they’re vertical. I used two screws per bracket — one at the top and bottom of the vertical side. Here’s a video of this step:
Measure the distance between the mounting holes on the back of your solar panel. Use this distance to mark where to attach the mending plates. Screw the mending plates to the angled side (the hypotenuse) of the brackets. Attach two plates per bracket, oriented inward. Here’s a video illustrating what I mean:
